Working with Visual Studio will give you both good and bad days. This tip may give you one or two more of the good ones.
Visual studio automatically stores your copy/cut commands up to 10 times. This means that you've not only the possibility to paste the last word that you copied or cut, but the 10 last ones.
To use this feature simply use [Ctrl + Shift + V] instead of [Ctrl + V] and keep hitting to go back through your copy/cut history.
Enjoy!
Wednesday, April 4, 2012


Tuesday, April 3, 2012
GridView, List of objects and sorting
Binding a GridView to a list of objects is a neat way to expose your data through Entity Framework. Now sorting a List of objects could be a bit tricky if you want it to be dynamic. In this scenario Linq and Lamdba offers great possibilities to achieve your goal.
2. Define your gridview and set the event “onsorting”.
<asp:GridView ID="myGridView" runat="server"...
onsorting="gridView_Sorting">
{
//Get the datasource and last sortDirection (enum (int) in this case):
List<YourObject> yourObjects = CurrentDataSource;
int currentSortDirection = CurrentSortDirection;
if (yourObjects != null)
{
//Use the e.SortExpression to order the list of objects
var param = Expression.Parameter(typeof(YourObject), e.SortExpression);
var sortExpression = Expression.Lambda<Func<YourObject, object>>(Expression.Convert(Expression.Property(param, e.SortExpression), typeof(object)), param);
//Set the list ordered ascending as datasource
if (currentSortDirection == (int)SortDirection.ascending)
{
myGridView.DataSource = yourObjects.AsQueryable<YourObject>().OrderBy(sortExpression);
}
//Set the list ordered descending as datasource
else
{
myGridView.DataSource = yourObjects.AsQueryable<YourObject>().OrderByDescending(sortExpression);
}
if (currentSortDirection == (int)SortDirection.ascending)
CurrentSortDirection = (int)SortDirection.descending;
else
CurrentSortDirection = (int)SortDirection.ascending;
myGridView.DataBind();
}
}
4. Your all set. Good luck.
1. Add using statement:
using System.Linq.Expressions; 2. Define your gridview and set the event “onsorting”.
<asp:GridView ID="myGridView" runat="server"...
onsorting="gridView_Sorting">
3. Set up your sorting method:
protected void gridView_Sorting(object sender, GridViewSortEventArgs e){
//Get the datasource and last sortDirection (enum (int) in this case):
List<YourObject> yourObjects = CurrentDataSource;
int currentSortDirection = CurrentSortDirection;
if (yourObjects != null)
{
//Use the e.SortExpression to order the list of objects
var param = Expression.Parameter(typeof(YourObject), e.SortExpression);
var sortExpression = Expression.Lambda<Func<YourObject, object>>(Expression.Convert(Expression.Property(param, e.SortExpression), typeof(object)), param);
//Set the list ordered ascending as datasource
if (currentSortDirection == (int)SortDirection.ascending)
{
myGridView.DataSource = yourObjects.AsQueryable<YourObject>().OrderBy(sortExpression);
}
//Set the list ordered descending as datasource
else
{
myGridView.DataSource = yourObjects.AsQueryable<YourObject>().OrderByDescending(sortExpression);
}
if (currentSortDirection == (int)SortDirection.ascending)
CurrentSortDirection = (int)SortDirection.descending;
else
CurrentSortDirection = (int)SortDirection.ascending;
myGridView.DataBind();
}
}
4. Your all set. Good luck.
Tuesday, March 13, 2012
Invert scroll wheel direction in Windows
When I first installed Mac OS X Lion I had a bit of a struggle accepting that the scroll direction was inverted. But I gave it a chance and soon realized that the “new” way of scrolling felt much more natural, the pages are scrolled by pulling the page down and not the scrollbar – just like on a smart phone or tablet. Getting used to it have a backside though, it gets confused again when working in Windows where the scroll isn’t inverted. Windows doesn’t have any GUI to change the scroll direction, but it’s a pretty simple change in the registry to change it.
Browse the key “HKEY_LOCAL_MACHINE\SYSTEM\CurrentControlSet\Enum\HID\”:

Here you will find a collection of keys named something like “VID_xxxx&PID_xxxx”. Each key contains settings for different input devices. To find out which key contains settings for your mouse, open the device manager and check the properties for the mouse. In the Information tab select Hardware-ID and a list of IDs will show – and one of these has the same name as the key you are looking for in the registry. Now expand that key and go through all subkeys and look for a leaf node key called “Device Parameters”. Look for the attribute “FlipFlopWheel” and change the value from 0 (default) to 1. Reboot might be necessary.
Browse the key “HKEY_LOCAL_MACHINE\SYSTEM\CurrentControlSet\Enum\HID\”:
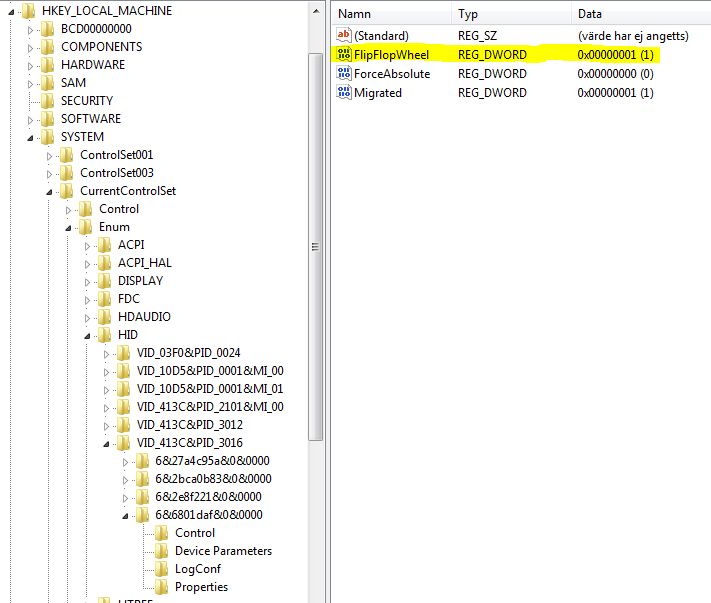
Here you will find a collection of keys named something like “VID_xxxx&PID_xxxx”.
 Each key contains settings for different input devices. To find out which key contains settings for your mouse, open the device manager and check the properties for the mouse. In the Information tab select Hardware-ID and a list of IDs will show – and one of these has the same name as the key you are looking for in the registry. Now expand that key and go through all subkeys and look for a leaf node key called “Device Parameters”. Look for the attribute “FlipFlopWheel” and change the value from 0 (default) to 1. Reboot might be necessary.
Wednesday, February 15, 2012
Check all ASP CheckBoxes within an ASP Repeater with JavaScript to avoid PostBack
Problem:

I created my own CheckBoxList with an ASP Repeater that contained several ASP CheckBoxes and some labels. I also wanted to have the function to check and uncheck all the checkboxes within the repeater. This was easy to do with an OnCheckedChanged=”SomeCodeBehind” and AutoPostBack=”true” on the design file. This gave a working result but since it made a post back each time, the control flashed for a quick second every time the checkbox was clicked and sometimes even gave me time enough to click on the checkbox multiple times. In other words, it gave an impression of a slow application.
The next problem appeared when this controlwas inserted in to an AJAX Modal Popup window. Whenever the control made a postback the modal popup was closed. A solution would be to make an EventHandler for each time the checkbox is clicked, in that way the event could be caught within the parent control and trigger a function to reopen the modal popup again. But since this event is not needed in any other situation this solution felt a bit to much.
Solution
Javascript! But the first question that arised was "How to get hold of all the elements within a repeater?" Well it is not that complicated actually. First of let me show the design of my repeater:HTML:
- <div id="Div_CheckBoxList">
- <asp:repeater id="Repeater_CheckBoxList" runat="server">
- <headertemplate>
- <table id="Table_CheckBoxList">
- <tr>
- <th>
- <asp:checkbox id="CheckBox_CheckAll" runat="server"></asp:checkbox>
- </th>
- <th>
- <asp:label id="Label_CheckAllText" runat="server" text="Check/Uncheck all"></asp:label>
- </th>
- </tr>
- </headertemplate>
- <itemtemplate>
- <tr>
- <td>
- <asp:checkbox id="CheckBox_RepeaterItem"></asp:checkbox>
- </td>
- <td>
- <asp:label id="Label_CheckBoxText" runat="server"></asp:label>
- </td>
- </tr>
- </itemtemplate>
- </asp:repeater>
- </div>
And now to the magic! Here is the javascript function checkAll that checks and unchecks all the checkboxes within the repeater. It obtains the client ID (since we are working with ASP controls) of the element that contains all the checkboxes. It could be a panel or a div, but in this case we use the repeaters client ID.
All the elements within this "container" are then extracted and iterated through. What we are looking for is an element with an ID that contains the word "checkbox". And we also know that the first checkbox that we will find (since it is furtherest up in the page) is the "check/uncheck all"-checkbox. The interesting thing about that checkbox is to know if it is checked or unchecked to be able to check the rest equally. And that would be all!
NOTE! You maybe ask yourself why we do not get all the elements from the document, document.getElementsByTagName('*') instead? Well that is because sometimes there might be other checkboxes on the page, or in my case I want to be able to introduce two repeaters on the same page, without clicking the "check/uncheck all"-checkbox on one repeater also affects the other one.
JavaScript
function checkAll(containerClientID) {
var repeater = document.getElementById(containerClientID);
var all = repeater.getElementsByTagName('*');
var found = false;
var isChecked = true;
for (var i = 1; i < all.length; i++) {
var e = all[i];
if (e.id.toUpperCase().indexOf("CHECKBOX") != -1) {
if (found) {
e.checked = isChecked;
}
else {
isChecked = e.checked;
found = true;
}}}}
To be able to use this javascript following change must be done on the HTML code:
HTML
<asp:CheckBox id="CheckBox_CheckAll" ...
onClick='<%# "javascript:checkAll(\"" + this.Div_AlternatingTable.ClientID + "\");" %>'
... />
The following code is for making only one checkbox in the repeater to be able to be selected simultaniously.
JavaScript
function checkOne(containerClientID, checkboxIndex) {
var repeater = document.getElementById(containerClientID);
var all = repeater.getElementsByTagName('*');
var currentCheckboxIndex = 0;
for (var i = 1; i < all.length; i++) {
var e = all[i];
if (e.id.toUpperCase().indexOf("CHECKBOX") != -1) {
if (currentCheckboxIndex != checkboxIndex) {
e.checked = false;
}
currentCheckboxIndex++;
}}}
And the following changes need to be done on the HTML
HTML
<asp:CheckBox id="CheckBox_RepeaterItem" ...
onClick='<%# "javascript:checkOne(\"" + this.Div_AlternatingTable.ClientID + "\",\"" + Container.ItemIndex + "\");" %>'
... />
Wednesday, February 8, 2012
Quick tip: PopupControlExtender displays popup in wrong position
 When using multiple PopupControlExtenders in a page the positioning of the popup panels might get a little bit shifted, as shown in the filter example. (Using Position="Bottom")
 One way to make sure this doesn't happen is to always set a css-class with the style "display: none;" on all panels that will be used as popups. This will fix the alignment, and will also remove the flicker of the control when loading the page:
Using System Center Orchestrator 2012 to monitor folders
One big drawback with the existing "Monitor Folder" activity in System Center Orchestrator 2012 RC is that it will only trigger on files dropped while your runbook is actually running. That means that if you temporarily stop your runbook to do an adjustment, all files that some other system drops in your folder while doing this will be ignored when you start your runbook again.
It's pretty easy to avoid this by instead scheduling a powershell script that returns all files in your folder.
Here's a simple example:
Start by adding a Monitor Date/Time activity and set an appropriate polling interval. I'll set mine to 1 minute.

Next add a "Run .Net Script" activity and link that to the monitor acitivity. Select PowerShell as language and paste this into the script window (modify it to your own lab folder). The *copy* file mask is by the way a handy tip when developing these kind of workflows. Using this you will be able to keep a file in your dev directory and just copy-paste it in the same directory to kick your workflow.
$FileName = (Get-ChildItem c:\temp\lab\*copy*.xml) | Select-Object FullName
$Count=@(Get-ChildItem c:\temp\lab\*copy*.xml).Count
The $Count parameter will be used to decide whether or not to continue and the $FileName parameter will be used to perform some kind of operations on that file.

Now set the data that will be published:

Now you're all set to continue building your runbook. In my example i will just copy the file to another location. On the link set the following condition

Now add the copy file activity.

As you may note I do a little magic on the FileName parameter…Here’s a better view on that

This is what my runbook looks like. I also log when no files are found in this example (set NumberOfFiles equals 0 on the link if you want to do that as well)

Thursday, October 13, 2011
Using SCCM client center functionality to import local policy
Tired of waiting for collection evaluation and policy updates when advertising programs in SCCM? There is a function in SCCM client center that imports local machine policies, but it requires that an elevated user runs the program and there is not batch functionality.
By referencing the smsclictr.automation.dll this functionality can be reused to build workflow activities/batch programs that calls the same logic as SCCM client center uses. Example code:
By referencing the smsclictr.automation.dll this functionality can be reused to build workflow activities/batch programs that calls the same logic as SCCM client center uses. Example code:
SMSClient client = new SMSClient(computerName);
client.Connection.Connect();
if (client.Connection.mScope.IsConnected)
{
//Connect to the clients managementPoint SQL server
SqlConnectionStringBuilder sqlConnectionBuilder = new SqlConnectionStringBuilder("Integrated Security=True");
sqlConnectionBuilder.DataSource = client.ManagementPoint;
sqlConnectionBuilder.InitialCatalog = "SMS_" + client.SiteCode;

SqlConnection sqlConnection = new SqlConnection(sqlConnectionBuilder.ToString());
try
{
sqlConnection.Open();
SqlCommand command = new SqlCommand();
command.CommandText = "SELECT PolicyID, Body FROM Policy WHERE (PolicyID LIKE '%" + advertisementID + "%') ORDER BY PolicyID";
command.Connection = sqlConnection;

SqlDataReader dataReader = command.ExecuteReader();
while (dataReader.Read())
{
byte[] policyBody = dataReader[1] as byte[];
client.SoftwareDistribution.ImportSCCMPolicy(policyBody, false);
Logging.Log("Policy imported on computer '" + computerName + "' (AdvertisementID: " + advertisementID + ")", System.Diagnostics.EventLogEntryType.Information);
break;
}
sqlConnection.Close();
}
catch (Exception ex)
{
Logging.Log("Failed to get policy from SQL for advertisement '" + advertisementID + "'. Error: " + ex.ToString(), System.Diagnostics.EventLogEntryType.Error);
}
}
Subscribe to:
Posts (Atom)